Colouring by vector / colouring in Paintshop Pro 3
![]()
Finally... The last page! Not that much left now...
![]()
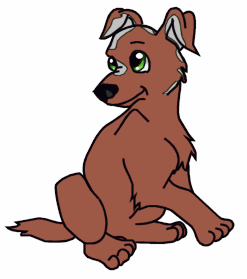
|
Just to show you how to draw your shadows... |
What it'll look like... |
|
|
|
Step
10
Now we'll make a 4th layer, although it won't be on top on the 3rd
one... Go to layer 2. Now choose Layers > New Vector Layer. However, this
time, change the opacity to somewhere around 10 - 20! This is very
important!!! Do not make it 100!!! I chose 13.
Now, make the
foreground and background colours black in the color meny.
Use the
Draw tool, freehand, width 1 (or 2 if you prefer).
Draw like you did before
when drawing the outline, but draw how you want the shadow. Make the shape
connect at some point, or it won't be filled with colour. This part is real
hard for me to explain... I hope you understand... Look above (:)
You
can draw on top of the outline, but don't draw outside it. It's almost like
using the paint brush for colouring...
Keep drawing all the shadows you want done... And then go to the next step :)
![]()

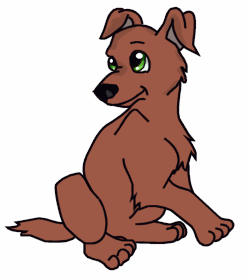
Step 11
Here I've
added all the shadows. Now it's time for the highlights (yay). There are two
basic ways: Draw them in the same layer, or make a new one with same or
different opacity. I prefer making the highlights with slightly less opacity
than the shadows, so I make a new vector layer, this time with opacity no more
than 5. Instead of black, use white. Then draw just like you did with the
shadows.
Remember, if you ever want to change the opacity of a layer, you
can always go to the layer, choose Layer > Properties.
![]()

Step 12
There!
Now, the basic image is finally done! *wipes off some sweat*
Now, whe might
want to add a background. There are lots of ways, and I won't tell you about
them all.. But here are a few examples:
|
Mess around, try different ways and choose what you like best :)
![]()

Step 13
I made
this background in Terragen, a landscape-generating program, and then pasted
it as a new layer (above the 1st layer). I made yet another vector layer with
opacity 17, and drew the shadow under the pup. I also added my name at the top
of the picture. Merge your image into one layer (Layers > Merge > Merge
all (Flatten). If you want, you can add a few extra touches, such as a 3D
border (Effects > 3D Effects > Buttonize).
Your pic is now done! I
hope that you are happy with the result! I'd recommend saving it as a jpg. Use
the optimizer in PSP (Save as > (choose jpeg) Options > Run Optimizer)
for the best result.
Good luck with your
drawings!
![]()