Colouring in Photoshop
![]()
Okay, I'll show you how I colour
lineart in Photoshop. Please not that I currently use a swedish version, I don't
know what all the tools are called in english.
Photoshop is really a program for photos, as some like to claim. After all, it's
named photoshop, but you can still make some kick-ass pics in it XD
I originally learnt this method from a tutorial on Neato Forum, I don't remember who wrote it though. Credits go to the person who first thought of this method (mine might be just slightly different though) ^^
And yes, Satan's frontleg should
be straight like that, I looked it up XD
Remember to save now and then. Photoshop froze right when I was almost done with
the shading, and I was convinced that I was gonna loose everything... Luckily I
managed to save the pic!
![]()
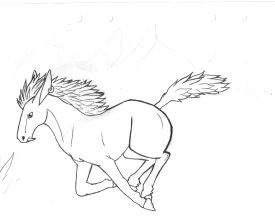
Step 1 - It's easier if you actually have a pic to colour
This is the pic that I'm gonna use. First off, I like to scan my pics at
twice their original size, and then resize it to 50 %. It looks nicer then,
because scanners are generally quite evil and miss a lot of detail otherwise.
Okay, the pic above is shown at 25 % of original size, to save loading time for
all poor modems out there. It's Satan, a renddemon, (c) his creator. Mwah.
Okay, make sure that the pic support 16 million colours. Go to Image, and then
um... the option at the top ^^; Choose RGB.
You might want to clean up your pic a little. I started drawing a background down in the left corner, but quickly (very quickly) decided to not continue it. Simply use the eraser and get rid of the worst unwanted lines in the pic. Don't bother about the small details, the next step will take care of that.
Step 2 - Scary windows
Okay, choose Image > Adjust > Layers. A meny-thing should pop up.
Looks detailed, advanced and scarey, ne? Don't sweat it! This is a nice
window *pets window* See? It's not dangerous at all! See the little grey
arrowhead, around the middle? Try moving it around! To get the effect we want,
move it to the right. Not necessarily all the way, just until the pic is dark
enough.
Okay, choose Selection... Um, I
don't remember exactly what the option you want was called. I believe it was
something like "by colour" or whatever. Colour selection, maybe... It
should be right under "Invert".
Eep! Another scary window! Okay, choose "fuzz" at 200 (it should
always be at 200 when you colour a pic this way in photoshop). Now, make a
selection! Simply click on a black area of your pic. Be sure that you click on a
dark area, or we will get the wrong type of selection.

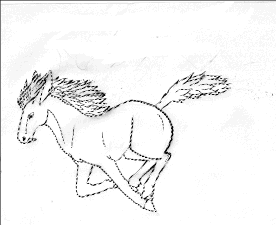
Step 3 - Let's make some layers
Make three new layers. You can either choose Layer > New > Layer, or
click the quick little "new layer" button in the little layer options
meny window. Make three new ones, like I said. Okay, you should be at the top
layer. Choose black colour, and use the fill tool to fill your selection. You
probably won't see too much change yet, but just wait!
Go to the layer just above the very first layer, with the original sketch. Choose De-select from the selection meny, and fill the whole layer with white colour. Notice any difference yet? You should, anyway :)

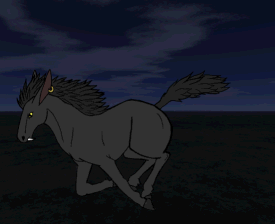
Step 4 - Whee! Colour!
If you are as lazy as me, you can resize your pic now, to its real size, 50
%. Just choose Image > Image Size, and be sure to change the options so that
you're changing to 50 %, not 50 pixels ;)
Okay, there is a transparent layer, above the white one. This is where you do the real colouring job! You can use the paintbrush, the airbrush, whatever... I like the paintbrush. The black outline won't be affected, so don't worry about it. Keep in mind where you're drawing though, don't make a background just yet, just work on the (in this care) horsey!
I'm also going to tell you a
little secret...
In the layer options meny-window thing, do you see a little box? It says
different things in different versions of photoshop, but it usually says
something like "lock". If you check it, only areas that have been
coloured already can be edited! This is very practical, for example when you
wanna add some shading to the horse's neck, but don't want the background to get
darker as well. Of course, you can always uncheck the box if you want to add
colour to more areas :)
Above, I've done a basic colouring job. No shading or such yet! Poor Satan, he must feel sad running around in the air like that...
Step 5 - Which is why we'll add a background!
Time to go back to our lovley white layer, and fix ourselves a background. Okay,
I will not go through how to draw in photoshop, because 1) I'm not good at it
myself, and 2) it's not really part of this tuorial. Add whatever background you
want :) Heck, my might not even want to use one... In that case, go to step 6 XD
I did a basic background in a free
landscape render program called Terragen. I belive you can find it at www.download.com.
I simply pasted it into the white layer, so biggies. I did soften it a bit, to
make it look less realistic and match the movement in the pic better.

Step 6 - Shading
Okay, do the shading. I use the paintbrush on the "colouring
layer", like before, but I change the colour to a darker/lighter, and
change the opacity to about 30 %. Then I just draw over the image, adding
darker/lighter wherever I want! It's not very hard! Use a "blurry"
brush or one of the "scruffy" ones for a more textured look.
Since this is a dark ebil horsey in a dark ebil landscape, this whole pic will
be very dark.
The "lock" ability comes in handy now *hint hint*
As you can see, I also added a moon (at least it's supposed to be one...). I made a new layer above the background (I could have done it on the background, but I was afraid that I'd mess it up). I first used a very blurry pencil to do the corona, then simply used the paintbrush and clicked once (or was it twice?), using a large size, to get the moon itself. I then used a few different tones to add texture, and once more a blurry corona, which was placed over the whole moon. Moons are hard to draw Oo;
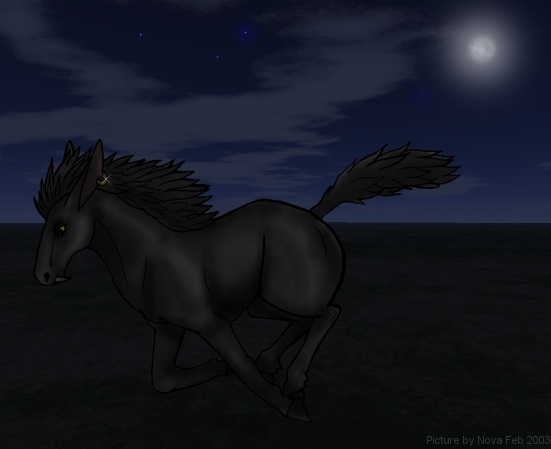
Step 7 - Finished
And here is the finished result! That wasn't so hard, was it?
This pic is very dark, but hopefully it could still help you :)
Note:
The stars and glitter-thingie aren't part of this tutorial, they were added in
Paintshop pro. If you wanna know how to make them in PSP, it's not hard. Use the
Picture tube for the stars (I used the Color to Target to make them more blue in
color) and a custom paintbrush for the shine on the earring.
![]()