Vectorize a petzpic (aka drawing petz on the computer)
![]()
To be honest, I wasn't sure what
to call this tutorial *lol* I don't even if the word "vectorize"
exists, but oh well ;) Neither do I know what good this tutorial is, but it's a
way to draw petz right on the computer, without the need of pens/paper, scanner,
tablet... All you need is a petpic to use as a base.
Basically, I'm going to turn a petzpic into a drawing by using vector in PSP. In
other words, if you don't have Paintshop pro, I don't think you'll learn too
much from this tutorial... Okay, let's start then!
First off... We need... Music! Put on some good music that helps your creativity... Whatever you prefer. I'd say some calm, "natural" music could work well, perhaps something by Robert Rich or Enya.
![]()

Step 1 - Ready...
Okay, first we need a petpic to use. Unless the pic you get is from Petz 5,
it has but 256 colours and we will need to increase that, or this tutorial won't
work. Okay, press Colours > Increase Color Depth > 16 million colors.
Okay, we're all set and ready to begin with the real fun!
Now, vector isn't like normal lines and such. Ever drawn in MS Paint? Well, if
you have, you know that once you've drawn a line, you can't change it. It's
there to stay, right? Vector is different - a vector line can be changed after
you've drawn it! You can change its colour, thickness... you name it! But, to
enable vector in our image, we will have to make a special vector layer. Okay,
press Layers > New vector layer. Don't change any of the options, just press
okay :)
Step 2 - Set...
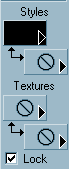
Alright, look in the meny-thing to the left... see the tool that looks like
a pencil drawing a line? If you can't see it, press View > Toolbars and check
the tool palette - and also make sure that the Tool Options Palette is checked!
When choosing the pencil, we need to check a few options. Ok, it should be set
on width 1 or 2, antialias and create as vector checked, but NOT close path
checked! Ok, the line style should be the default straight line and style...
Well, freehand or point-to-point, whichever you prefer!
Colours? Make the foreground colour black, don't use any any background colour.
It should look like above.
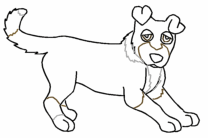
Step 3 - Go!
Okay, we will now use the petpic to basically redraw the whole pet - on top
of the old layer! But we will use vector. We'll start by drawing the outline.
Well, what are you waiting for? Draw the pet ;) Try messing around with the
vector options and see what effects etc you can get. I can't really tell you
what to do, exept practice ;) I've never seen anyone use this particular style
before, I tried it once. It didn't look too good, but I kept trying and
improved, and figured I'd try it with a petzpic... By practicing and trying, you
can learn a lot!
Above I've drawn the basic outline. As you can see, I've not followed the
outline *everywhere* That's okay :)
Now I'll make the markings, but I'll make them in other colours, rather than
black, to match the pet better!
Step 4 - Details, details...
Done with the outline? Well, let's take a look!
Go back to the first layer (Layers, then click on the 1st layer) and get rid of
the petpic. You can choose the fill tool (with tolerance set to 200) or the
paintbrush...
Wee, a pic of your pet! Now all we need to do is color it! I prefer using the
paintbrush, and simply color in, like you were colouring in a colouring book :)
Don't worry about the outline, since it's on a higher layer, it won't get
affected.

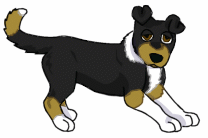
Step 5 - Wee! Colours
Here I've done the basic colouring job. Ok, I'd like to put some shading on top
of that, wouldn't you? My fave way to add shading is to make a new vector layer,
but make its opacity around 20 or so, and then use black (or blue, on white
areas) as both fore- and background colour, and then simply draw in the shadows.
Er... That made no sense, but I don't know how else to describe it ^^;
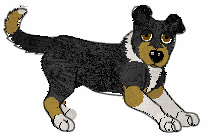
Step 6 - Done!
And there you go! Wasn't so hard, was it?
Um... Between you and me...
I've never ever done this before, this particular pic of Night was my first try
ever... heh ^^;;
![]()